Do You Know What is Injection Molding?
Injection molding is a forming process that uses molds and is used to manufacture commodities and products in a wide range of industries.
This section introduces the basics of injection molding

1. Overview and Characteristics
Injection molding is a forming process using molds. Materials such as synthetic resins (plastics) are heated and melted, and then sent to the mold where they are cooled to form the designed shape. Due to the resemblance to the process of injecting fluids using a syringe, this process is called injection molding. The flow of the process is as follows: Materials are melted and poured into the mold, where they harden, and then the products are taken out and finished.
With injection molding, diversely shaped parts, including those with complex shapes, can be continuously and quickly manufactured in large volumes. Therefore, injection molding is used to manufacture commodities and products in a wide range of industries.
2. Injection Molding Machines
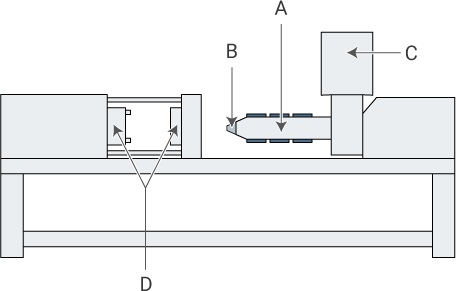
Injection molding machines come in different types, such as motorized machines driven by servo motors, hydraulic machines driven by hydraulic motors, and hybrid machines driven by a combination of a servo motor and a hydraulic motor. The structure of an injection molding machine can be briefly summarized as consisting of an injection unit that sends the melted materials into the mold, and a clamping unit that operates the mold.
In recent years, the use of CNC has been increasingly adopted in injection molding machines, giving rise to the popularity of models that enable high-speed injection under programmed control. On the other hand, a number of specialized machines, such as models that form the light guide plates for LCD monitors, are also used.

A
Cylinder (heats the material)
B
Nozzle (injects the melted material)
C
Hopper (material feeder)
D
Mold (material is poured into the mold cavity between two plates)
3. Injection Molding Process
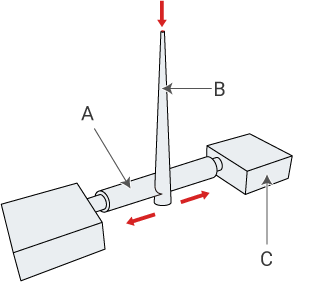
Injection molding begins with resin pellets (granules) being poured into the hopper, the entry point for the material. The pellets are then heated and melted inside the cylinder in preparation for injection. The material is then forced through the nozzle of the injection unit before being delivered through a channel in the mold called a sprue and then through branched runners into the mold cavity. After the material cools and hardens, the mold opens, and the molded part is ejected from the mold. To finish the molded part, the sprue and runner are trimmed from the part.
It is important that the melted material is evenly delivered throughout the mold as often times there is more than one cavity within the mold allowing for the production of more than one part at a time. Therefore, the mold shape should be designed in a way that ensures this, such as by having runners of the same dimensions.
While injection molding is suitable for mass production, it is essential to have a good understanding of the various conditions required to produce high-precision products, which include the selection of resin material, the processing precision of the mold, and the temperature and speed of the melt injection.
Nozzle for injecting melted material

After forming, the runners are trimmed from the molded part to complete the process.
How does it work?
Although on the face of it, the injection molding process may seem simple, there are many parameters which need to be tightly controlled to ensure the overall quality of the plastic components produced. Understanding the process and parameters in some depth will help manufacturers to identify plastic components producers who can provide the quality and consistency they need.
Step 1: selecting the right thermoplastic and mold
Before the actual process begins, it’s key that the right thermoplastics and molds are selected or created, as these are the essential elements that create and form the final components. Indeed, to make the right selection, manufacturers need to consider how the thermoplastic and mold interact together, as certain types of plastics might not be suitable for particular mold designs.
Each mold tool is made up of two parts: the cavity and the core. The cavity is a fixed part that the plastic is injected into, and the core is a moving part that fits into the cavity to help form the component’s final shape. Depending on requirements, mold tools can be designed to produce multiple or complex components. The repeated high pressures and temperatures that mold tools are put under mean they are typically made from steel or aluminum.
Due to the high level of design and quality of materials involved, developing mold tools is a long and expensive process. Hence, before creating a final bespoke mold, it’s recommended that tools are created, prototyped and tested using computer aided design (CAD) and 3D printing technology. These tools can be used to digitally develop or create a prototype mold that can then be tested in the machine with the chosen thermoplastic.
Testing the tool with the right thermoplastic is key to ensuring that the final component has the right properties. Each thermoplastic offers different characteristics, temperature and pressure resistances due to their molecular structure. Plastics with an ordered molecular structure are called semi-crystalline and those with a looser structure are known as amorphous plastics.
Each plastic’s properties will make them appropriate for use in certain molds and components. The most common thermoplastics used in injection molding and their characteristics include:
Acrylonitrile-Butadiene-Styrene (ABS) – with a smooth, rigid and tough finish, ABS is great for components that require tensile strength and stability.
Nylons (PA) – available in a range of types, different nylons offer various properties. Typically, nylons have good temperature and chemical resistance and can absorb moisture.
Polycarbonate (PC) – a high-performance plastic, PC is lightweight, has high impact strength and stability, alongside some good electrical properties.
Polypropylene (PP) – with good fatigue and heat resistance, PP is semi-rigid, translucent and tough.
The final thermoplastic selection will depend on the characteristics that manufacturers need from their final component and the design of the mold tool. For example, if a manufacturer needs a lightweight part with electrical properties, then PC will be appropriate, but only if the mold doesn’t need to operate above 135C or at very high pressures, which the plastic won’t be able to resist.
Once the right thermoplastic and mold have been tested and selected, the injection molding process can begin.
Step 2: feeding and melting the thermoplastic
Injection molding machines can be powered by either hydraulics or electricity. Increasingly, Essentra Components is replacing its hydraulic machines with electric-powered injection molding machines, showing significant cost and energy savings. At their most basic level, these machines consist of a feeder or ‘hopper’ at the top of the machine; a long, cylindrical heated barrel, which a large injection screw sits in; a gate, which sits at the end of the barrel; and the chosen mold tool, which the gate is connected to.
To start the process, raw pellets of the chosen thermoplastics are fed into the hopper at the top of the machine. As the screw turns, these pellets are fed gradually into the barrel of the machine. The turning of the screw and the heat from the barrel gradually warm and melt the thermoplastic until it is molten.
Maintaining the right temperatures within this part of the process is key to ensuring the plastic can be injected efficiently and the final part formed accurately.
Step 3: injecting the plastic into the mold
Once the molten plastic reaches the end of the barrel, the gate (which controls the injection of plastic) closes and the screw moves back. This draws through a set amount of plastic and builds up the pressure in the screw ready for injection. At the same time, the two parts of the mold tool close together and are held under high pressure, known as clamp pressure.
Injection pressure and clamp pressure must be balanced to ensure the part forms correctly and that no plastic escapes the tool during injection. Once the right pressure in the tool and screw is reached, the gate opens, the screw moves forward, and the molten plastic is injected into the mold.
Step 4: holding and cooling time
Once most of the plastic is injected into the mold, it is held under pressure for a set period. This is known as ‘holding time’ and can range from milliseconds to minutes depending on the type of thermoplastic and complexity of the part. This holding time is key to ensuring that the plastic packs out the tool and is formed correctly.
After the holding phase, the screw draws back, releasing pressure and allowing the part to cool in the mold. This is known as ‘cooling time’, it can also range from a few seconds to some minutes and ensures that the component sets correctly before being ejected and finished on the production line.
Step 5: ejection and finishing processes
After the holding and cooling times have passed and the part is mostly formed, pins or plates eject the parts from the tool. These drop into a compartment or onto a conveyor belt at the bottom of the machine. In some cases, finishing processes such as polishing, dying or removing excess plastic (known as spurs) may be required, which can be completed by other machinery or operators. Once these processes are complete, the components will be ready to be packed up and distributed to manufacturers.
A
Runner
B
Sprue
C
Mold


